Today I welcome Anna Sawin as a new Kidoinfo contributing writer. Anna lives near the Rhode Island border on the coast of Connecticut, where she writes about her passions: kids, photography, and food. In addition to her professional life as a writer and an editor, she blogs about life with two young boys at Hank & Willie.
It’s summertime, and the activities from each busy day could fill their own photo album. Maybe you’ve got a new digital SLR camera, or maybe you’re a diehard point-n-shooter, but we’ve all got the same goal: taking the best possible pictures of our families, and preserving memories in the jewel-like light in which we remember them.
I can guarantee you’ll see great results in your photos if you try a few of these techniques, and I won’t even talk about shutter speed and f-stops. And if you’re a devotee of automatic settings, you don’t have to change your stripes. You can try all these tips in auto mode.

1. Get involved.
Get close. Then get closer. Then get down low. Chances are you’re taking a photo of your child in a location you’d like to remember–maybe a scenic mountainside or a sparkling beach. But one of the biggest mistakes we make in a photo is trying to include too much information, like taking a landscape shot that just happens to have a small, faraway person in it. Instead, fill the frame with your subject, making them the most important part of the photo. Because they are.
Want to remember the beach? Get up close to your child and photograph his toes buried in the sand, or the look on her face when she spies a new piece of sea glass. Want to remember the mountain? Zoom in as your child reaches to pick a wildflower or throws a rock in a rolling stream.
And unless you and your child are the same height, you’ll want to get down where the action is. It’s all part of getting involved.


2. Find the sweet light.
Your photos will be 1000 percent improved if you do nothing else but this: think about the best times of day for kids to be out in the sun, and shoot your photos then. That usually means early morning before the sun gets too intense (you’re all awake anyway, right?) and afternoon/evening when the intensity wanes.
Here in New England, at this time of year, that translates to before 8:00 a.m. and after 5:30 p.m. (Bribe ’em with ice cream if they are melting down at day’s end.) Full-day sunlight washes out colors, creates harsh, unflattering shadows, and causes sunburn, of course, while the warmth and softness of early- and late-day sun will bring a beautiful, unrivaled tone to your images.
Now, I know what you’re saying. Plenty of life goes on between 8 and 5:30, in fact most of the day for those of a certain age in my household. So if you’re stuck outside at high noon on a sunny day, pray for a cloud or find some open shade (a spot out of direct sun that’s lit by reflected light, like under a tree) and shoot your photos there. And if you end up with a cloudy day on vacation, you can be the annoying one that chirps, “Well, it’s an absolutely perfect day for photos!”

3. Go for the unexpected
If your child is about three or older, he or she probably knows what it means to pose for a photo and you end up with a series of lock-jawed grins. So go for the anti-pose. Have your child leap in the air. Make a crazy monster face and challenge them to make one too. (Guaranteed to get a laugh.) Sing the ABCs to them, and get it wrong, so they have to correct you, giggling all the way.
Younger than three? Try positioning them in or on something, like a ride-on horsie, a bathtub, a bucket, or a basket, and shoot away until they escape or are done. Then follow them around and capture their entirely un-self-conscious anti-poses. Or hand them a prop you can stand to see in your photos, like a bright red ball.


4. Get cheeky
When photographing more than one child together, have them avoid perpetuating the grip-and-grin pose they see in adults. Instead think of creative ways to get their faces close together. Have them lie on the ground and look up, which almost always brings on the giggles. Encourage a whispered secret or a kiss on the cheek. Or just request, “Cheeks together!” which will bring you sibling closeness you didn’t know you had.
5. Remove the bull’s eye from your child’s forehead
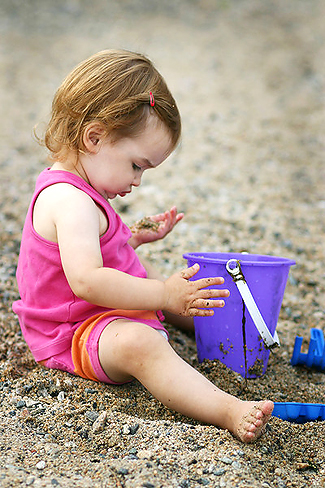
So you’re on the beach. It’s 5:45 in the afternoon, and glorious streams of golden light are bathing the scene in front of you. The sky is a brilliant blue, the sand is warm and inviting, Junior is waving his snappy red shovel and he flashes you a big, natural-looking grin. Mentally patting yourself on the back, you get down to his eye level, perform a quick check on the background to be sure the lifeguard chair isn’t growing out of his head, center him perfectly in the frame and…STOP!!!
Try this. Move your camera slightly to the right or left, so that Junior is off center. Is there something else across the frame that you can bring into the photo, like the bright blue bucket he just threw in frustration when his sand castle caved in? I promised no photo lingo in this post, but if you’re ever tempted to Google the phrase “rule of thirds,” you’ll learn a lot more about this composition technique. In short, it can make for a much more appealing and interesting photo. Give it a try.

6. Take your camera for a spin
Take your camera and turn it 90 degrees. Try using the camera in vertical or “portrait” position to capture an image of one or two children, a format that naturally crops extra information from the photo and focuses in close on the important stuff: your subject. While excellent portraits can be in either landscape (horizontal) or portrait (vertical) position, trying the portrait position might bring a brand new focus to your shots.
7. Don’t forget the gummy worms!
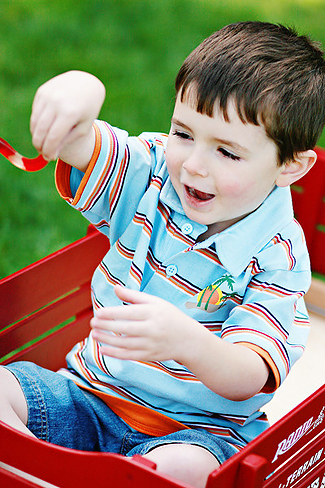
While portraits don’t need to have dead-on eye contact to be successful, there is always something a little disappointing about the image that is nearly perfect in every way, yet has a child with a vacant stare over your shoulder, probably because a well-intentioned person was jumping up and down trying to get a laugh.
When I’m nearing the end of a session (I use the term loosely, as I’ve been known to break out this trick in the backyard with my kids) and want to bag a few more good shots, I might drape a gummy worm around the barrel of my lens. This usually promotes a tractor-beam lock on my lens (hello, eye contact!), as well as an interesting discussion about worms and eating them, depending on the age of your subject. It doesn’t last long, and if you’re shooting someone else’s kids you probably want to check the guidelines on sugar consumption, but it can be a serious secret weapon at the right moment.
Before and After
This morning at a playdate, I tried to use some of these tips to demonstrate what they can do in two quick snapshots.
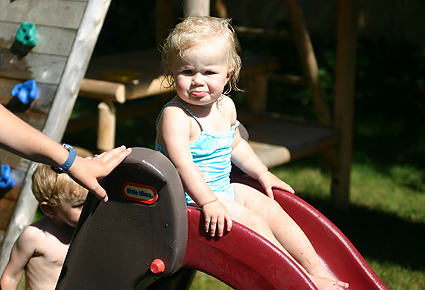
Here’s Sydney before, out in the blazing sun at about 11 a.m., in a cluttered snapshot, taken in landscape view. Like the disembodied adult arm and half toddler in the background?
Here’s Sydney a minute later, under a tree in her yard. This photo was taken at her level, in portrait view, in lovely open shade. She was so happy about it she even gave me a smile!

Got a great summer photo to share?
Post a link to your blog, Flickr, or Web page in the comments section here, and let me know if these tips are working for you. Don’t have a place to post your photos online? That’s a topic for another post!
Anna Sawin is a mother, writer, and photographer on the coast of Connecticut who claims she is PRACTICALLY a Rhode Islander. She blogs at Hank & Willie.


Thanks for the simple but helpful tips. Most photography advice is all about f-stops etc. and I snooze immediately!
Thanks so much. I look forward to your upcoming articles and assistance. I loved your article today and even thought about it as I edited a batch of pictures today.
Sarah,
As an alternative to being the pushy parent. Consider getting together with the hosting organization or other parents and either designating a photographer or hiring one. That way most parents can enjoy the experience instead of jockeying for position!
Hi Sarah, thanks for reading!
Your question is a good one, and I wish I had an easy answer. In my professional life as a magazine editor, when we want to capture a dance performance or
something else on stage in dim lighting, we do it on the night of the dress rehearsal with a professional who specializes in shooting in such conditions. Doesn’t give the rest of us much hope, does it?
Here’s a few thoughts.
1. Get as CLOSE as you possibly can. Forget staying in your seat, and be the pushy mom.
2. Is there a (dress) rehearsal you could attend, and thus capture a shot during a less intense or stressful time? And at a time when you could get almost unforgiveably close?
3. How else could you tell the story? What high-quality photos could you take before and after the performance that would give a complete and memorable picture of the whole event?
How about a shot as he dons his costume in costume? Take a cue from the bridal world, and shoot into a mirror, while standing behind your child (as they look into the mirror.)
Try a closeup of her feet as she puts her dance shoes on.
Go backstage and get the crew together shaking their nerves out before the show. The teacher or director might welcome some backstage shots, depending on the age of your child and peers.
Ask your child to recreate the curtain call after the show.
And capture the relaxed looks on their faces at the ice cream outing after the event!
Images like these, plus your required attempt at catching the action will help complete the story. And don’t forget to contact your local newspaper, who might have covered the event with a professional–buying a digital file is rarely expensive and sometimes nets a real win.
As for your other questions, you’ve provided me with a great topic for a future post. When I use a point and shoot, it is my four-year-old Canon, and there is very little high-tech about it! I don’t know the answer to your questions about face-recognition technology in a P & S or the d-lighting, but I’ll report back when I learn more.
Hope this helps,
Anna
Help!!!!
Any advice for the eternally frustrating school performance/dance performance/graduation etc indoor venue where kids are too far away for a flash to do any good and when you turn off the flash, the pictures are blurry. I use a basic point and shoot that is getting dated, but my friends all say they have this problem too, even with their fancier cameras.
I am shopping for a new point and shoot, the smaller, the better, so I’m open to suggestions, like does the face recognition technology really work? and does the new nikon technology (d-lighting) that says it works in indoor settings to correct dark pictures actually work? Any advice is much appreciated.
this is the best thing i have read about photography–so grateful F-stops weren’t mentioned. thanks, anna! advice i’ll actually use.